


This post explains how to add and edit a WordPress gallery using the block editor. Gallery blocks are provided with a standard WordPress install.
There are lots of ways to enhance a WordPress gallery with third party plugins – such as creating light boxes for image enlargements, which I cover at the end of the post.
Let’s first add a gallery.
Add a WordPress gallery
A WordPress gallery makes it possible to include more than one photograph or graphic in an area.
Images within a gallery are called thumbnails. WordPress crops them so that they are the same size. A tidy way to display multiple images.
- Hit the PLUS icon to create a new WordPress block.
- Within the block library, hit GALLERY if you can see the option. If not, search for GALLERY in the search field.
- A WordPress gallery block will embed itself on the page or post.
- Click the ‘Upload’ button to upload images from your computer.
- To include images already hosted in the Media Library, hit ‘Media Library’.
- Select several images. Selected images are highlighted in blue. Included images are marked with a TICK.
- Hit the button, bottom right labelled – CREATE A NEW GALLERY.

In the image above, you can see the selected items – WordPress makes it possible to clear the selection.
- On the EDIT GALLERY screen, use the link ‘Add to Gallery’ on the left hand side to continue to add images.
- Or INSERT GALLERY to the page by hitting the blue button, bottom left.

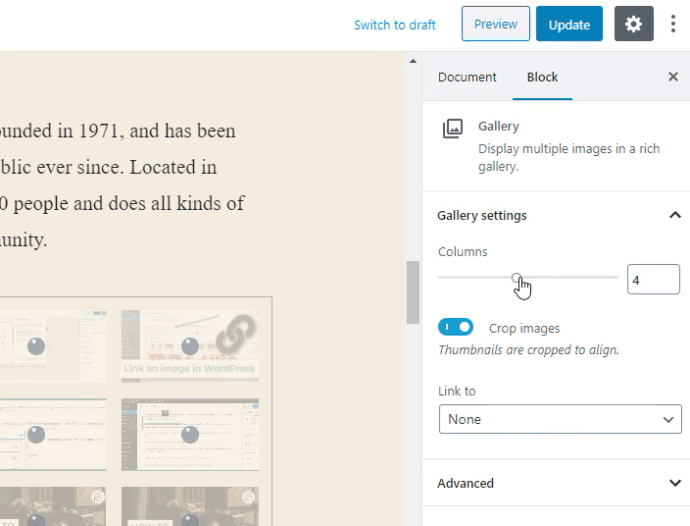
Once the gallery is inserted onto the page, gallery settings can be changed.
Select the gallery block and use the options that appear within the sidebar.
Alter the column number of the gallery here too.
Gallery columns setting
WordPress will automatically adjust column numbers according to device – mobile, tablet or desktop.
On a mobile the WordPress gallery appears in two columns. This ensures that gallery images are not too small. A risk if you tried to apply a six column gallery to the mobile version of a website.
Adjust the appearance for a tablet and a desktop in the gallery settings:
If the number of images does not equate to nice even rows, WordPress applies a grid effect. The images in the last row will span across fewer columns, filling gaps.
Add an image to a WordPress gallery
Once the gallery has been created it is easy to add extra images.
Select the gallery and hit MEDIA LIBRARY.
Over on the left hand side is a link to ‘Edit Gallery’. It’s not the most intuitive way to get to the edit screen, I agree.
Gallery thumbnails order
On the edit screen (covered above) drag the images to place them into a desired order. I find this a really easy way to organise my images, but there is another way.
You can also re-order the gallery thumbnails directly on the page.
- Select the Gallery block.
- Select an image. Left and right arrows appear on the image.
- Hit a direction and the image will move one place that direction.
WordPress gallery links
Thumbnails can only be linked to their respective selves or to an attachment page, which is a page that includes the enlargement.
To link the thumbnail click the thumbnail within the WordPress block. Over on the right hand side bar look for ‘Link to’. Use the drop down menu to choose ‘Media file’ or ‘Attachment page’.
Media file is WordPress’ default setting.
Linking thumbnail captions
Link to internal posts, pages and external URLs using thumbnail captions. I’ll show you how.

- Click a thumbnail within the gallery block.
- Write a caption in the field placed at the bottom of the image.
- Once written, highlight the caption.
- Find the paperclip icon on the caption toolbar.
- Search for a page or paste in a URL.
Find out more about hyperlinks in WordPress.
A gallery would be a great extra navigational tool for a website, sending users into sub-categories using the caption linking.
WordPress gallery enlargements
In web design, a lightbox is a pop up window that overlays the website. It darkens or lightens the web page and allows an image or a message box to be displayed, with less distraction.
The user can close the box with a CLOSE button, often a cross. Sometimes the user can click on the background or hit ESCAPE to close a lightbox.
If the plugin allows, the user can view more images using arrow buttons, NEXT and PREVIOUS.
Lightboxes are a nice way to show enlargement images on a website.
Install a lightbox plugin to display images within a lightbox; WordPress does not do that automatically.
Use a responsive lightbox plugin – it is really important that the image enlargement looks great on mobile, tablet and desktop.
Some free, responsive WordPress lightbox plugins that I have tried are listed below. All of them auto create lighboxes on a WordPress gallery as soon as they are activated.
- Simple Lightbox by Archtype
Very simple to use. It has next and previous buttons and automatically loops through the image group (slideshow) – this can be disabled. Simple options, not over complicated and looks good. Images are captioned, which can be deleted but leaves a space. - FooBox Image Lightbox WordPress Plugin by FooPlugins
FooBox is probably my favourite – it looks modern and is easy to use with next and previous buttons. I like the movement of the images as you go through. The pro version includes a slideshow. The upgrade is about £3 per month. - Responsive Lightbox & Gallery by dFactory
Has not got a next and previous button. I don’t like some of the themes that they provide, they look clunky but it is free.
I hope this post helps you out when adding or editing galleries in the WordPress block editor. They are so powerful now and look really good, I encourage their use.


