

A simple guide to help users to create a blog post in WordPress. Blog posts can be used as articles, recipes, white papers, news updates, or stories.
WordPress makes it very easy to add a blog post. Blogging helps a brand build a relationship with its audience.
Create a Blog Post in WordPress
Once logged in to your admin area, notice the left-hand menu. This menu is your way to almost all the tools that WordPress has to offer.
In this tutorial, we start with the menu item labelled Posts.
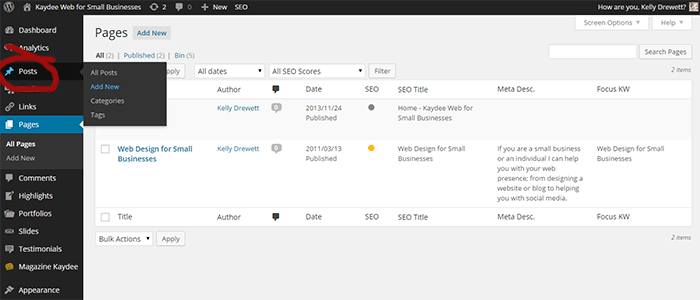
Clicking the ‘Posts’ menu item takes you to a list of posts on your blog. Published (public) posts and drafts (posts that are not available to the public) are listed here.
You can create a new blog post one of two ways:
- Click Add New at the top of the Posts page.
- Hover over the left-hand menu link labelled ‘Posts’ and then click Add New.
Writing a Blog Post
It is a good idea to research a key phrase before you start to write your post. A great tool is MOZ’s Keyword Explorer, where you can search for 10 keywords per month for free.
Find a low-competition key phrase you can rank for. As a small business, you don’t need to rank for keywords that have thousands of searches.
Your researched key phrase should be the title of your post.
WordPress Slugs
A slug is a part of the URL (or address) that identifies the web page or post. For example, the slug for this very page is “create-a-blog-post-in-wordpress”, which you can see in the address bar.
In WordPress, the slug is taken directly from the first title entered, but it can be manually changed. Be decisive when choosing a slug. Changing a slug later will result in a broken link on Google search results pages.
Choose a slug that includes your keywords but isn’t too long or too complicated. Keep it to 4-6 words.
If you’d like to change the slug hit the EDIT button, located next to the Permalink, under the title field.
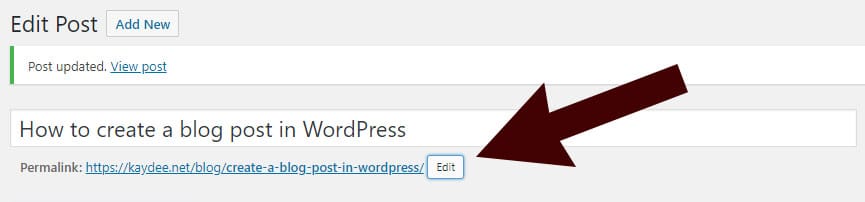
Once you have edited the slug, click OK and then save the post.
Saving a WordPress Blog
WordPress Drafts
In WordPress, posts can be saved as DRAFTS, which you can return to later.
We do this whilst editing a post so it doesn’t get published on the live site.
To save a draft whilst in the WordPress post editor, scroll to the top of the page and find the box on the right-hand side labelled Publish. If you haven’t saved the post already, you will see a SAVE DRAFT button.
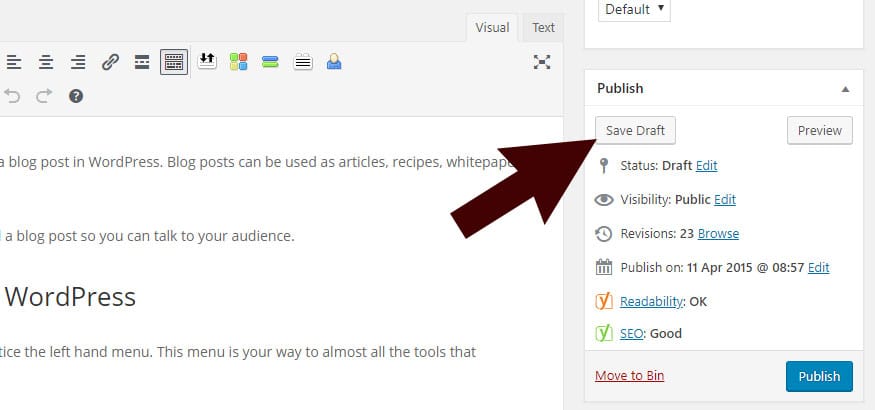
The post won’t be displayed on the public side of the website. It will be stored in the database, so you can come back to edit it later.
Please note: If you are logged into WordPress as an administrator you WILL be able to see your draft on the public facing website. This is so that you can test it.
Publish a WordPress Blog Post
Once the blog post is finalised, publish it using the blue Publish button within the Publish box on the top right-hand side of the page.
How To Schedule a WordPress Blog Post
WordPress allows you to publish a blog post at a later time.
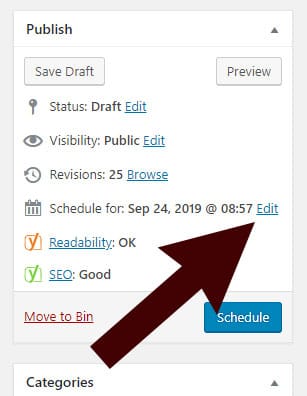
Again, look at the Publish box on the right-hand side. A calendar icon is used as a bullet point next to a date. The date would usually be the date you first published this post. If you hit EDIT at the end of the line and change the date to a future date, WordPress will publish the post then.
Switching Between Draft Post and Published Post
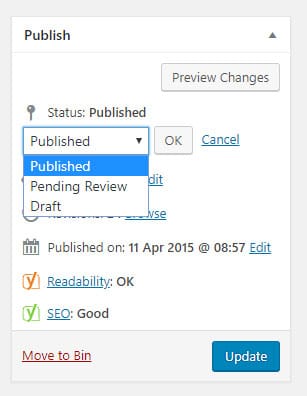
There could be a time when you come back to your post and would like to make edits, without them being public. In this case, you can switch between saving the post as a draft and publishing it. Go to the Publish box, find the post’s Status, and click Edit.
A menu will appear where you can choose the post’s status. Hit OK, then hit Update.
Categorising a Blog Post in WordPress
Notice the Categories box over on the right-hand side of the screen, under the Publish box. You can add a category from here, or choose which category the blog post belongs to.
Categorise your posts so visitors can find things easily, and create a simple hierarchy with clear keywords.
Just tick the box next to the relevant category and save your post.
Add a New Category from a Blog Post
You can add a new category by clicking on the “+Add New Category” link under the Categories box.
Type the name of your new category, and choose a Parent Category if you have one; otherwise, leave this dropdown box set to ‘Parent Category’. Now click the ‘Add New Category’ button.
There will be an automatic tick next to your newly created category. This means your post will be listed under that category.
Blogging to Support Website Rank
Blogging can be great fun, and invaluable support for your website. We are fortunate that WordPress makes it so easy for business owners to add news and updates to their own sites.
If you are not convinced about blogging yet, try reading my posts ‘Why Blog?‘ and ‘How a Blog Can Increase Traffic to a Website‘.