In this post, I teach you how to use the WordPress block editor, which has been included in WordPress updates since 2018 and it is here to stay. You’ll also hear it called the Gutenberg editor.
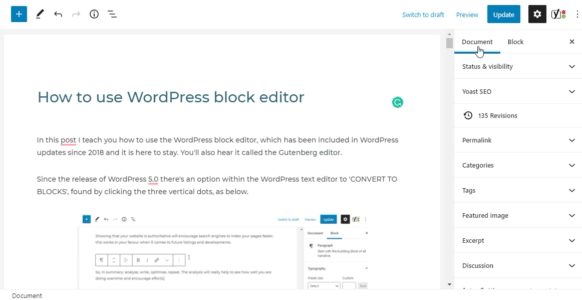
Since the release of WordPress 5.0, there’s an option within the WordPress text editor to ‘CONVERT TO BLOCKS’, found by clicking the three vertical dots, as below.
Should you convert to blocks?
If you’ve been using a third-party WordPress text editor there may be complications. I do not cover those in this post. Please find out more from a professional about converting and tread carefully.
For anyone else – I take no responsibility – always backup a website/blog before converting a page to blocks.
Already converted? Skip this section.
To those of you that have been using the classic editor and have a simple page layout – I can recommend WordPress blocks.
Once you’re used to the WordPress block editor, it’s intuitive.
Hitting CONVERT TO BLOCKS will not convert the whole website/blog to blocks. Just the page or post that you’re working on.
What happens when I convert to blocks?
Converting the page commits each heading, paragraph, a snippet of code and image into its own individual block.
You’ll soon get used to it, if you are only just converting.
Blocks enable you to easily add paragraphs, columns, tables, images, widgets, latest posts and categories.
As well as widgets such as latest posts, calendars, post archives, categories, social icons and RSS feeds.
WordPress blocks make it easy to add almost anything a website owner could wish for. It is really convenient.
One block represents one item, so it is also much easier to change the page order. We’ll cover that later.
View the WordPress website in a new tab
When editing, the first thing I do is I open the public-facing part of the website in a new browser tab. I then have the admin area (back end) visible in one tab, and the public area (front end) visible in the other. That way I can switch between the two.
The easiest way to open the front end of your WordPress website in a new tab is;
- In the admin area – hover over the house icon, top left of the screen.
- From the drop-down menu, RIGHT CLICK on ‘Visit Site’.
- Click “Open link in new tab”.
NB. There may be a variation of words depending on the browser you are using.
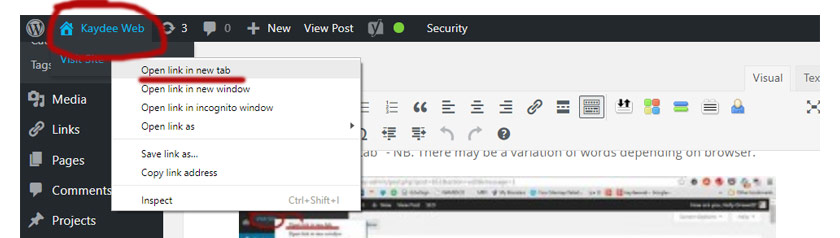
Two browser tabs are now open, meaning that you can switch between the two.
Continue to edit the WordPress page in one tab, using the admin area.
In the other, you will view the front end of your website. This is how to check each change you make.
As you make edits and save them, you can tab over to the front end of the site. Hit the F5 key to refresh the page – this prompts the browser to show the updated version.
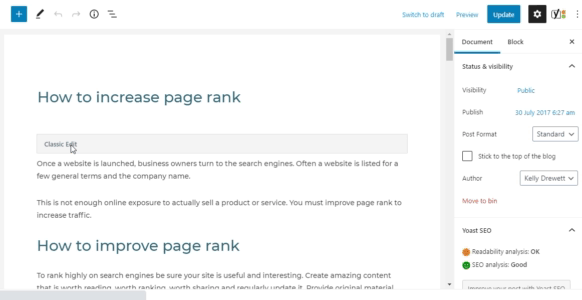
WordPress h1 heading and permalink
Let’s first look at the title and permalink.
The h1 heading is the first block at the top of the page. This is the only block that is immovable and that is for good reason.
All pages and posts should have an h1 heading at the very beginning so that search engines and humans understand what is contained on the page. It’s an SEO factor.
Use your mouse to click inside the title block. To change a title highlight the title text and start to type. Simple.
The permalink field is found within Document settings on the right-hand side, see image below. WordPress’ label for the page name is ‘URL Slug’.
Be careful when editing permalinks – I’ve included a warning at the bottom of this post.
Add a WordPress block
Hit the Plus + icon, top left to get started.
Explore the block library – there are so many options available here.
There are two more ways to add a block to a WordPress page.
If you are in a creative flow, add a block by hitting return.
The third way is done by hovering over a block – a Plus + icon appears.
At the time of writing, this is fiddly – hover over the exact centre bottom of the block for the icon to appear.
Hit the icon and choose a block style. The new block will show up below the plus icon.
WordPress paragraphs using blocks
Paragraph blocks will often be the most common elements of a WordPress page or post. Add a paragraph block and just start typing.
Hit return to create a new paragraph block and continue typing.
To make work flow faster, paragraph blocks can be transformed into other styles.
With the cursor in a new paragraph block type a / (forward slash). This shortcuts to a list of possible block types.
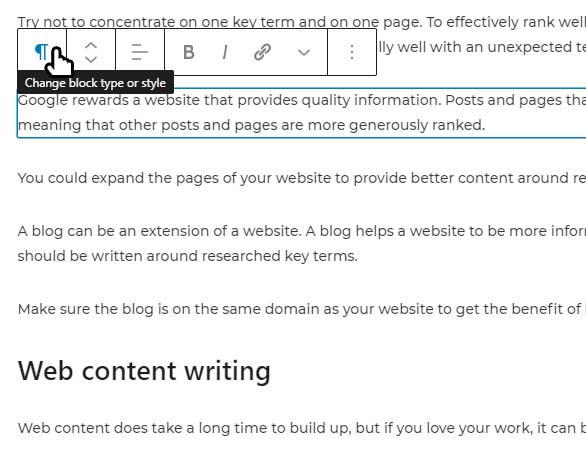
Alternatively, transform a block using the toolbar. On a selected block the toolbar appears, top left.
In the toolbar for a paragraph are options to change ‘block type or style’ or format text:
Transform WordPress paragraph block
Use ‘change block type or style’ button to transform the paragraph block. Transformation is limited to blocks of a similar ilk. I.e. Paragraphs can’t be changed into tables, but could be changed to headings.
Let’s change a paragraph into a header, for example.
The arrow, on the image below, points to the icon that represents a PARAGRAPH. This is how you know the block is a paragraph.
Click the icon to transform the paragraph.
Hit HEADING.
The paragraph icon changes into a H and you can see H2 next to it.
H1 can’t be chosen – a H1 should only ever be used for the title of the page.
The block is now a heading block.
Select H3 or a H4 by hitting the H2 button choosing from the menu.
Use headings as a hierarchy within pages and posts. Use H2 to divide the page into easy to read sections. Use H3 to sub divide those.
Format paragraphs and headings
Formatting text just means to add a specific style to it.
On a heading or a paragraph block, highlight the text you’d like to format.
The toolbar magically appears, top left of the block. This is where you’ll find options to make text bold, italic or add a text hyperlink.
It is still possible to use keyboard shortcuts – highlight text and use:
- Control-b for bold
- Control-i for italics.
- Control-u will underline text.
Mac users – use command key instead of the control key.
Visit WordPress keyboard shortcuts for a useful list.
Notice that there is a down arrow on the toolbar; a drop-down menu for ‘more rich-text controls’. Two other styles are found here – strike through and text colour.
Be careful with text colour – the theme will govern the look of the website. Fewer colours in a corporate scheme make a website look professional. Use text colour sparingly.
‘Inline code’ and an ‘inline image’ are also found within this menu.
Any ‘inline’ will be positioned within the line of text you are typing. Useful for code snippets and possibly icons, but bigger images would look odd in my opinion.
Paragraph settings
Select a paragraph block to view options on the right hand side of the WordPress screen.
Change the size of your text here.
Really nice if have a strapline you’d like to stand out.
There is also the ability to change the colour of whole paragraphs. I would warn against getting too crazy with these options.
More transformation options for paragraphs
Other transformation options for the paragraph block are:
- a list,
- a pre-formatted block,
- a quote,
- a verse
- or a group.
Lists
Lists are WordPress’ label for bullet points – really useful to help items to stand out on a web page. There are two types of list available:
- Ordered list (OL) – optionally ordered by roman numerals, decimals or letters.
- Unordered list (UL) – styled bullet points.
Just like paragraphs, lists can be formatted. There is also an option to indent a list, so sub-lists can be created within lists.
We’ve not seen the blocks ‘preformatted’ or ‘verse’ in WordPress, before so I will explain a little about those block types.
Preformatted block in WordPress
The preformatted block allows WordPress users to type text exactly as they’d like to, preserving line breaks and indents.
I’m not totally clear what this is used for at the moment. Someone enlighten me.
In an empty paragraph block, type /preformatted then hit enter to create a preformatted block.
Or use the toolbar as covered above.
Verse
WordPress say that the verse block is ideal for adding poetry to your site, so aptly named.
More advanced users can add CSS to verse blocks, so that makes styling the verse block easy.
Roses arered, Violets are blue.
Buttons in WordPress block editor
The WordPress block editor allows the editor to create bespoke buttons.
They are simple buttons with limited styles, nothing particularly ingenious about them. In my opinion WordPress has made the right decision – keep things clean is the better option.
To add a button use the ‘Add block’ icon, and select ‘Button’.
Start to type the button text straight away.
Now, there are two parts to a ‘button block’, which can get confusing.
A button is contained within an external block. Click on the button, then click just outside the button, in the white space to see what I mean.
Move or drag the button using the containing block. The button can be aligned within it.
Click ON the button and that can be styled – colour, text, border. This is also where you’d link the button.
Make sense?
Select the button – more styling options are available over on the right hand side of WordPress.
Styling can be added to the button text, just like a paragraph. Be careful linking the text.
I’ve discovered that WordPress gives the ability to link the TEXT of the button (via the button toolbar, just like a paragraph) or link the whole button via the options on the right. Slightly confusing.
The best option here is to link the whole button.
To do that select the button by clicking on it, see the Block options on the right hand side? Scroll all the way down to the bottom and pop your link into the Link rel field.
I advise against activating the ‘open new tab’ option, as search engines prefer that the user makes the decision to open new tabs.
In the example button above, I have added a Font Awesome icon by copying the HTML code from Font Awesome:
<i class="fas fa-arrow-right"></i>To include it on your button, select the button, hit the 3 vertical dots at the end of the toolbar and choose ‘Edit as HTML’. Paste the HTML code before the closing </a> tag.
This icon is available only if Font Awesome is installed.
Groups of blocks
A group block allows the editor to add more than one block inside it, so that the group can be moved around, duplicated or reused as a whole.
Useful for layouts. Or to keep headings and paragraphs together so the page doesn’t become jumbled.
However, I have found GROUPS to be slightly frustrating, as they just seem to disappear! I believe this is a bug in WordPress.
I’ve tried Chrome, Firefox and Edge.
I do have a little trick to stop a GROUP from just disappearing once it’s been added – add a garish background colour to it, as soon as it lands on the page.
I was then able to drag other blocks into it, and change the background colour once complete. Not ideal.
Duplicate a WordPress block
I love that it is so easy to duplicated a WordPress block now. Simply click inside the block to select it, then hit the three vertical dots on the toolbar. Hit duplicate.
Alternatively, when you are in a block use the shortcut CONTROL-SHIFT-D (COMMAND-SHIFT-D on a Mac).
Reuse a WordPress block
Another great feature about WordPress blocks is the REUSABLE BLOCK option.
The style you’ve created for a block can be saved and used again. This reduces the need to recreate each item throughout the site.
Click on any block to show the toolbar, then click the 3 vertical dots to the right. Here you will find a menu item labelled ‘Add to Reusable Blocks‘.
The saved reusable block is found within the block library under the ‘Reuseable’ tab. Just find and add it like any other block. Handy.
Reuseable blocks can be managed, so you haven’t got too many surplus ones in the collection.
Be sure to save your work. Then, on any post or page look at the top of the screen, you’ll see the PREVIEW and UPDATE buttons and a cogge icon.
At the end of that bar you’ll find 3 vertical dots, click them to see a list. At the bottom is the option to ‘Manage all reusable blocks’.
Manage the reusable blocks in a similar way to posts – click on the names to edit them.
Editing a reusable block will NOT change the styling of blocks already on the site.
How to drag a WordPress block
Since the update to WordPress 5.5 the drag option is not obvious.
You need to select the block, then click and hold on the up-down arrows.
When you drag the block, areas will be highlighted in blue indicating where the block will be dropped once the mouse is released.
I hope this helps you to start editing WordPress using the WordPress block editor. There is a lot more to cover, so please see my other posts on:
- How to add images to WordPress.
- Link an image in WordPress.
- Headings and paragraphs in WordPress.
- Hyperlink in WordPress.
- Formatting in WordPress.
- How to add a PDF to WordPress (and link to it).
Plenty to get on with! Let me know how you get on.