Want to link an image in WordPress? When you link an image the image itself becomes clickable.
I explain the difference between internal links (to a post or page) and external links (to a URL) and links to media files and attachment pages.
Click here if you are looking to add a text hyperlink in WordPress.

Link to an internal page or post
- Open the WordPress post or page in the admin area.
- Find the image on the page or add the image to the WordPress page.
- Highlight the image simply by selecting it.
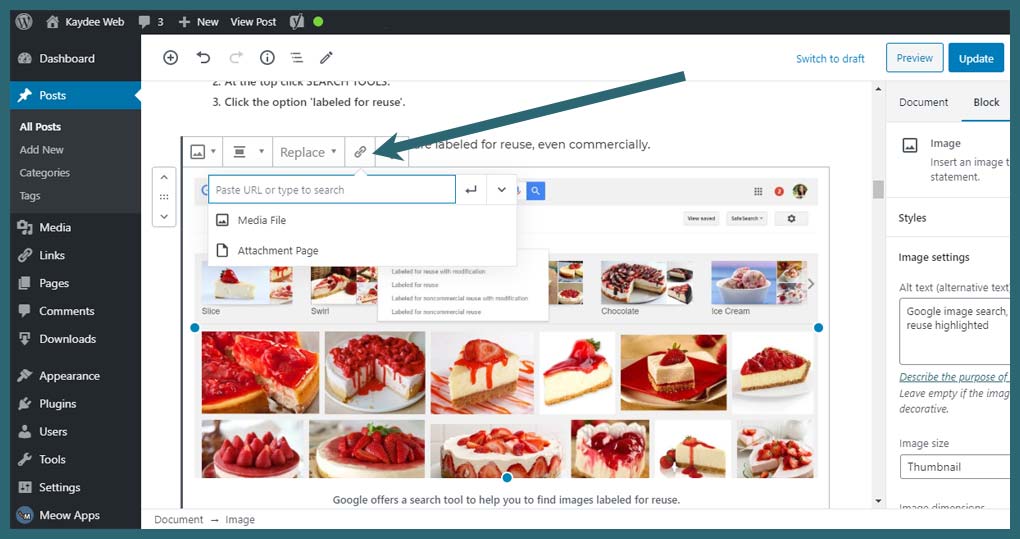
- A toolbar appears in the top left of the image.
- Click on the icon resembling a paper clip.
- Put the cursor in the field that says ‘Paste URL or type to search’.
- Search for the article either by the title or the URL (also known as slug or permalink). WordPress makes this really easy by differentiating between posts and pages.
- Once found, click the page/post – WordPress will link the image straight away.
- You’ll now see an option to EDIT the link if you made a mistake. There is also a toggle button to OPEN IN A NEW TAB – see the bottom of the post for important information on this.
- Click off the image.
- Click ‘Update’ to save the page or post.
Link to an external website
- Find the true URL of the page you’d like to link to by navigating to the web page in a different browser tab. Once there, select the full URL and ‘Control-C’ (Windows) or ‘Command-C’ (Apple) to copy the URL.
- Now, return to the WordPress editor.
- Follow steps 1 – 6 above.
- ‘Control-P‘/’Command-P’ to paste the URL into the field or click the URL that appears below. There is a toggle button to open in a new tab, see the text below.
- Click off the image.
- Click Update to save the page or post.
WordPress link to media file
When linking an image, WordPress gives an option to select MEDIA FILE.
This choice will link the image on the page to the original image.
In many cases, the image on the page will be a smaller version – a thumbnail. The linked MEDIA FILE will be the larger, original version.
This option will produce a link to an enlarged image, which lets visitors see it in more detail. The smaller version downloads quicker to the page.
To link an image to itself:
- Follow steps 1 – 5 in the first tutorial, above.
- Click MEDIA FILE, below the search field.
- ‘Update’ the page/post to save.
This is not the same as a lightbox effect- which is when the linked image shows over the top of the current page, with a dark or light covering over the rest of the site.
To produce a lightbox effect in WordPress install a third-party plugin such as Responsive Lightbox.
WordPress link to an attachment page
Another option when linking a WordPress image is to link to an attachment page.
An attachment page is a single page that contains the image.
When linking to an attachment page you send the visitor to a completely new page of your site, which has the site design, menu etc. The image sits in the middle and will be the only thing on the page.
Opening an attachment page is not seen so often as it can look untidy.
Opening links in a new tab
When linking, WordPress always gives the option to ‘open in a new tab’.
To follow search engine guidelines, I advise never to open links in a new tab.
In SEO guidelines, search engines request that the user has full control.
Forcing a new tab to open takes away the freedom of choice – we expect links to open in the same tab unless we request something different. No one wants to suddenly find 30 tabs open.
Therefore, search engines penalise websites that do this.
By the way, you can open any link in a new tab, by right-clicking a link and selecting ‘open in new tab’.
