This post helps you to understand how to add images to WordPress. I let you know how to add a single image directly to a page. You’ll also learn about sourcing images, resizing and compressing.
Find out how a WordPress gallery can be used to display multiple images.
Skip straight to Add a single image to WordPress
Why use images in WordPress?
Routinely add images to make the reading experience more pleasant, something that search engines reward.
Search engines rank a web page higher if they see appropriate images.
They know humans are visual and a web page looks rather like a text document without an image.
The reader is more satisfied by the appearance of images and ultimately that is what a search engine expects a web page to do – appeal to an audience.
Sourcing images for a blog or website
Consider shape
When deciding on an image, first consider shape.
- It needs to fit the designated space – is that landscape, portrait or a square?
- We don’t want to lose the main focus of the image once it is resized.
Screenshot stock images before spending any money. Even with a watermark across it size, shape and colour can be checked before making a final purchase.
Where to find images
I use a number of sources for photos and graphics and, infrequently, create my own. It depends on where the image will be used.
On my website I want photographs to look professional but my blog can have a more relaxed, friendly vibe.
There are a number of ways to source photos for a website or blog, free or paid for.
Pay a professional photographer
I am an advocate for professional photographers. Professional photos can make a website look sharp.
If you can’t afford to go pro you could try a local amateur photographer. Amateur photographers are keen to get a portfolio together, so can often be cheaper.
A business can pay a photographer for a day, or half a day to get all the commercial shots they will need for a few years, and it is truly worth it.
Get product, portfolio and team photos done in one day.
Tidy up location, clean the business vehicles, get haircuts and really make an effort to get some good shots, inside and outside of your workplace.
However, I understand a photographer can get expensive for start-ups that have a high turnover of products. Taking photos at home can work.
Take photographs yourself
Smartphones have really good cameras these days. If you have the eye for it, taking your own photos can work really well and save you money.
Set the camera to the highest resolution, so you can crop photos any way you please.
Useful products that will help with home photography.
Team photos or videos can be captured using a tripod, a nice background and good lighting. If you need them regularly it can be worth spending the money on some equipment.
Photograph small products for your website using a lightbox studio kit or the taller diffusing lights in the photography lighting kit.
Natural ‘home photography’ does help to put life, character and reality into blogs or social media posts, so don’t be afraid of natural environments or selfies.
Ask friends or business connections
You could swap a service – ask friends or business connections to provide photos. Offer to cite them or provide a link to their website, which is valuable for PageRank.
Use a stock website
It may prove difficult to create images to fit the article, which is where stock websites are useful.
There’s an abundance of stock websites that provide photographs, graphics, illustrations, icons and videos on almost any topic you could think of – a really useful resource.
You can get professional photos for as low as £5 for a lifetime license. Well worth it if you’re running a business.
A few stock image websites I like are istockphoto.com, twenty20.com, and shutterstock.com.
The free image stock site called Pexels is brilliant. Download free photos from amateur photographers and upload your own.
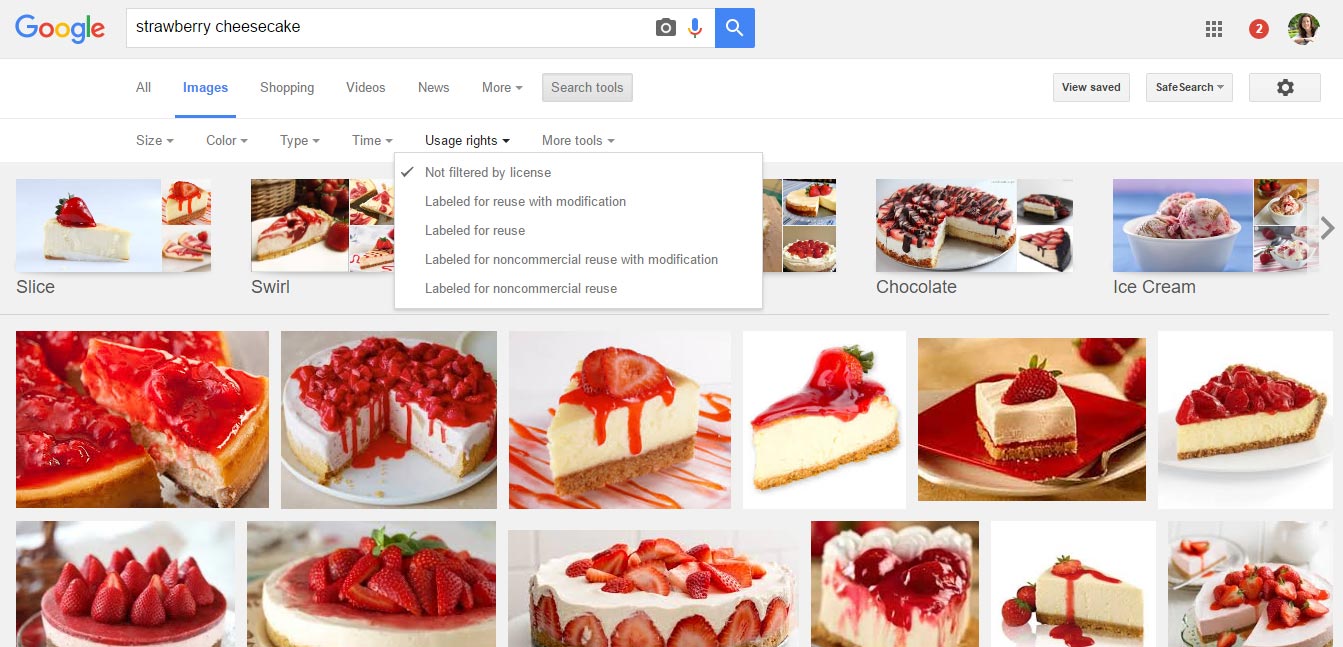
Use Google images, ‘labelled for reuse’
Google offers a search tool that helps find images that are labelled for reuse.
- Either go directly to www.google.com and search for a subject then click IMAGES.
Or go directly to images.google.com. - At the top click SEARCH TOOLS.
- Click the option ‘labelled for reuse.
Google displays a grid of images that are labelled for reuse, even commercially.

Be vigilant. It is your own responsibility to check the copyright of each image. Follow guidelines – you can be heavily fined if you don’t.
Click the image to visit the web page. Read the copyright requirements.
A link to the photographer’s page or a credit may be required.
Warning when using Google images
Some images in the public domain are available for reuse on commercial sites, others are not.
Like anything else, photos and graphics are created by someone with skill. They, therefore, own the rights, even if it’s not clearly stated.
Be careful when downloading images directly from Google or any other website, heavy fines are handed out for misuse.
Resize and compress images for the web
The way an image is resized, compressed, saved and placed will affect the search engine rank of a web page.
Websites with slow-loading images are penalised by search engines. Visitors won’t always want to wait for them either.
I’ve written a post dedicated to this subject – How to resize an image for the web. The post talks about resizing images by pixel and compressing them to reduce kilobytes.
Unfortunately, there is no single, standard size that I can let you know here.
All websites are different and there are many screen sizes that an image can be seen on – from as small as a phone to as big as a TV.
Keep these things in mind:
- Photos should never be less than 450 pixels wide because they will likely stack on a mobile device, 450 will fill a mobile screen and be just over half a medium screen, so good for a two-column display. These are the defaults for most WordPress plugins.
- Full-screen enlargements or ‘hero images’ as they are known (those at the top of a website that stretches from left to right of the screen) need to be as big as 1920 pixels wide to accommodate extra-large screens. That is quite big, and not even big enough for larger TVs.
- Consider using adaptive image plugins in WordPress to display adequate sizes for devices.
Read my post – How to resize an image for the web for much more detail.
Save images for Google search
Search engines can instantly recognise what an image illustrates if it is saved in the right way. The file name is an essential part of optimisation for search engines.
Save the image according to the subject matter of the photograph.
I.e. Saving an image as <strawberry-cheese-cake.jpg> is more informative and effective than <image07_912.JPG>.
Search engines will recognise the effort.
Google quality guidelines ask website owners to ‘place images next to relevant text’ where possible. Make sure that any images you use are relevant to the text.
Once you have resized, compressed and saved your image correctly you are ready to add it to WordPress.
Add an image to WordPress

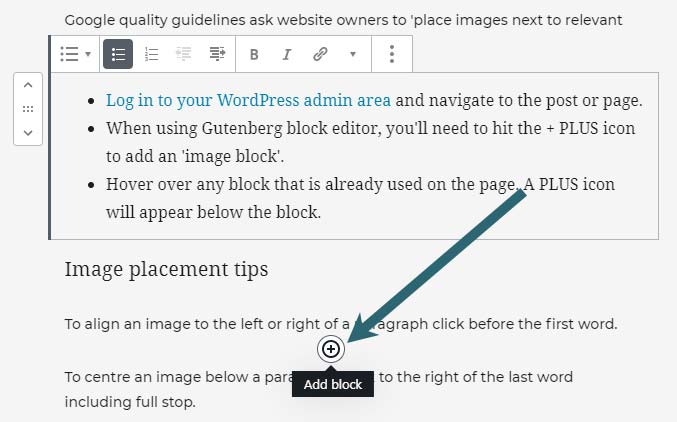
- Log in to your WordPress admin area and navigate to the post or page.
- Using the Gutenberg block editor, we’ll hit the + PLUS icon to add an ‘image block’. Just hover over any block that is already used on the page. The PLUS icon appears below the block.

- Once you hit the PLUS sign, a menu pops up containing block options.
- There is a ‘most used’ section which is handy for regularly used blocks. If you can’t see IMAGE here, use the search field at the top.
- The new image block is placed below the PLUS symbol you clicked on. Blocks can easily be moved using the UP/DOWN arrows to the left of a selected block.
- Hit the UPLOAD button to upload an image.
- The image will appear within the block. Any image you upload will show within the media library too.
Image alignment in WordPress
An image can be aligned within its block using the toolbar. The toolbar appears top left when the image is selected.
Use the icon that resembles a box with two lines, one above, and one below.
Just hit the arrow to the right of the icon to find options that will align the image left, right, centre, wide or full width.
Always save, then check on the front end to see how the image is positioned. The image may not be aligned quite the way you imagined. The back-end editor tells a different story from the front end.
Check it on a desktop computer and mobile devices to get it correct on both screen sizes.
Images can also be linked or replaced using the image toolbar.
WordPress columns for image placement
We use columns in the WordPress block editor, to place an image to the left or right of another block on a big screen. Imagine newspaper columns displayed next to one another.
This is how we would place an image next to a paragraph, for example.
On a small device, like a smartphone, columns will stack, one above another. Usually, the left column will stack on top of the right column.
To create 2 columns:
- Hit the PLUS symbol to create a block.
- Now hit COLUMNS or search for COLUMNS.
- Choose the far left option, two columns, equal split.
- Hit the plus sign within each column to add an image, as above, to one column.
- Hit the plus sign within the next column to add a paragraph.
Optimising images for search engines in WordPress
I would like to highlight two more important attributes that WordPress provides to help website owners to optimise images for search.
Alt text (alt tag)
Alt text stands for alternative text, it is an information tag.
The Alt tag is used to help people – those with ‘images turned off’, users with visual impairments and/or using screen readers.
The alt tag also helps Google to understand what the image is.
Use key phrases when writing it.
In WordPress blocks, you will see a field for the ALT tag once you click on the image block. It is on the right-hand side of the page, under the block settings.
Image captions
Providing image captions will also help search engine rank, although I don’t use them often as I find them messy.
Google wants you to provide the user with a good experience once they are on the website.
To add a caption just click the image block on the page, and the CAPTION field will appear under the image.
If you don’t include a caption, nothing will appear here at all.
WordPress galleries
A WordPress Gallery provides the ability to include more than one photograph in an area, all with a similar layout.
A quick tutorial to add a WordPress gallery:
- Hit the PLUS symbol to create a block.
- Search for then hit GALLERY.
- A gallery block appears on the page or post.
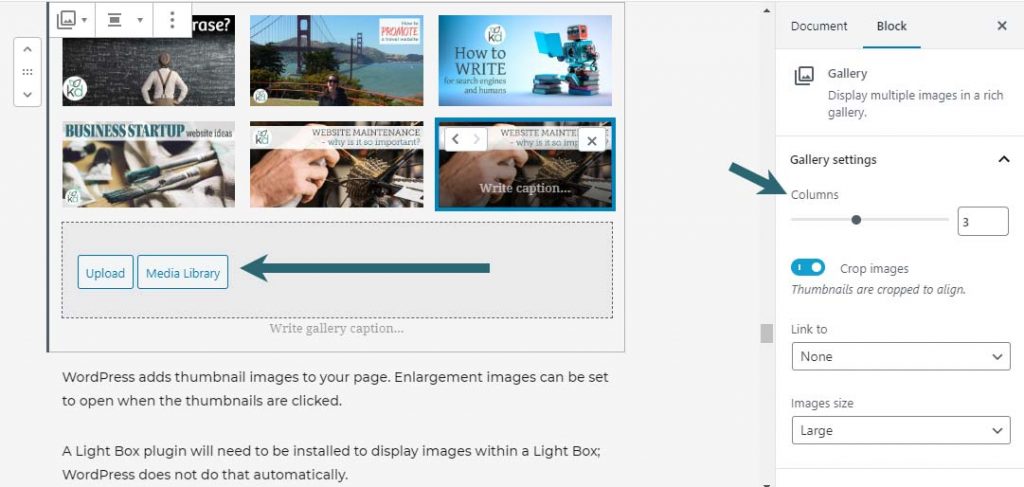
- Click the ‘Upload’ button to upload images from the computer.
- Use the ‘Media Library’ button to include images that are already hosted in the Media Library.
- Select several images – they will be highlighted in blue and you’ll see a tick.
- Hit the blue button, on the bottom right labelled – CREATE A NEW GALLERY.
- Keep adding to the gallery using the links on the left-hand side.
- Or INSERT GALLERY to the page, using the blue button, bottom left.
Once the gallery is on the page settings can be changed – select the GALLERY block, then use the block settings that appear within the sidebar on the right.

I’ve written a much more in-depth post that will help – WordPress gallery – add, edit and enhance.
Quick process to add images to WordPress
- Find an appropriately proportioned image.
- Check if it is available for reuse or buy a license.
- Resize the pixel width to fit the article.
- Use compression software to bring kb down.
- Save it according to Google requirements.
- Add it to a post, page or WordPress gallery using blocks.
- Optimise each image using ALT tags, title tags and captions.
