

To edit pages in WordPress, you do not need to be terribly technical – if you have some experience with a text editor, you will find it simple enough. Use the WordPress editor for both posts and pages.
Also see: How to Edit a Page Name >
The examples I’ve used here are in the WordPress.org system, but WordPress.com is comparable in the way pages are altered. The post will be helpful for both.
UPDATE. This post refers to the WordPress Classic Editor, not the WordPress Blocks (aka the Gutenberg WordPress Editor), which has been used since 2018. However, this post will still be helpful for some.
Let’s look at what you will learn.
By the end of this post, you’ll grasp how to format and edit pages in WordPress by:
- Editing and saving in the admin area,
- viewing changes on the front end,
- and using formatting tools in the WordPress editor.
Before updating any post or page, back up the WordPress database. We use DB Migrate, a free backup and migration plugin.
What You Need to Edit Pages in WordPress
- A WordPress username and password from your web developer.
- The URL of the administration area (also known as the web address, or possibly a link).
Once you have these, navigate to your URL by typing it in your browser or clicking the link.
Enter the username and password, then hit Log In. You will arrive at the WordPress dashboard.
View the WordPress Website in a New Tab
The first thing we do is open the public-facing part of the website in a new browser tab. We then have the admin area (back end) visible in one tab and the public space (front end) visible in the other. That way, we can switch between the two.
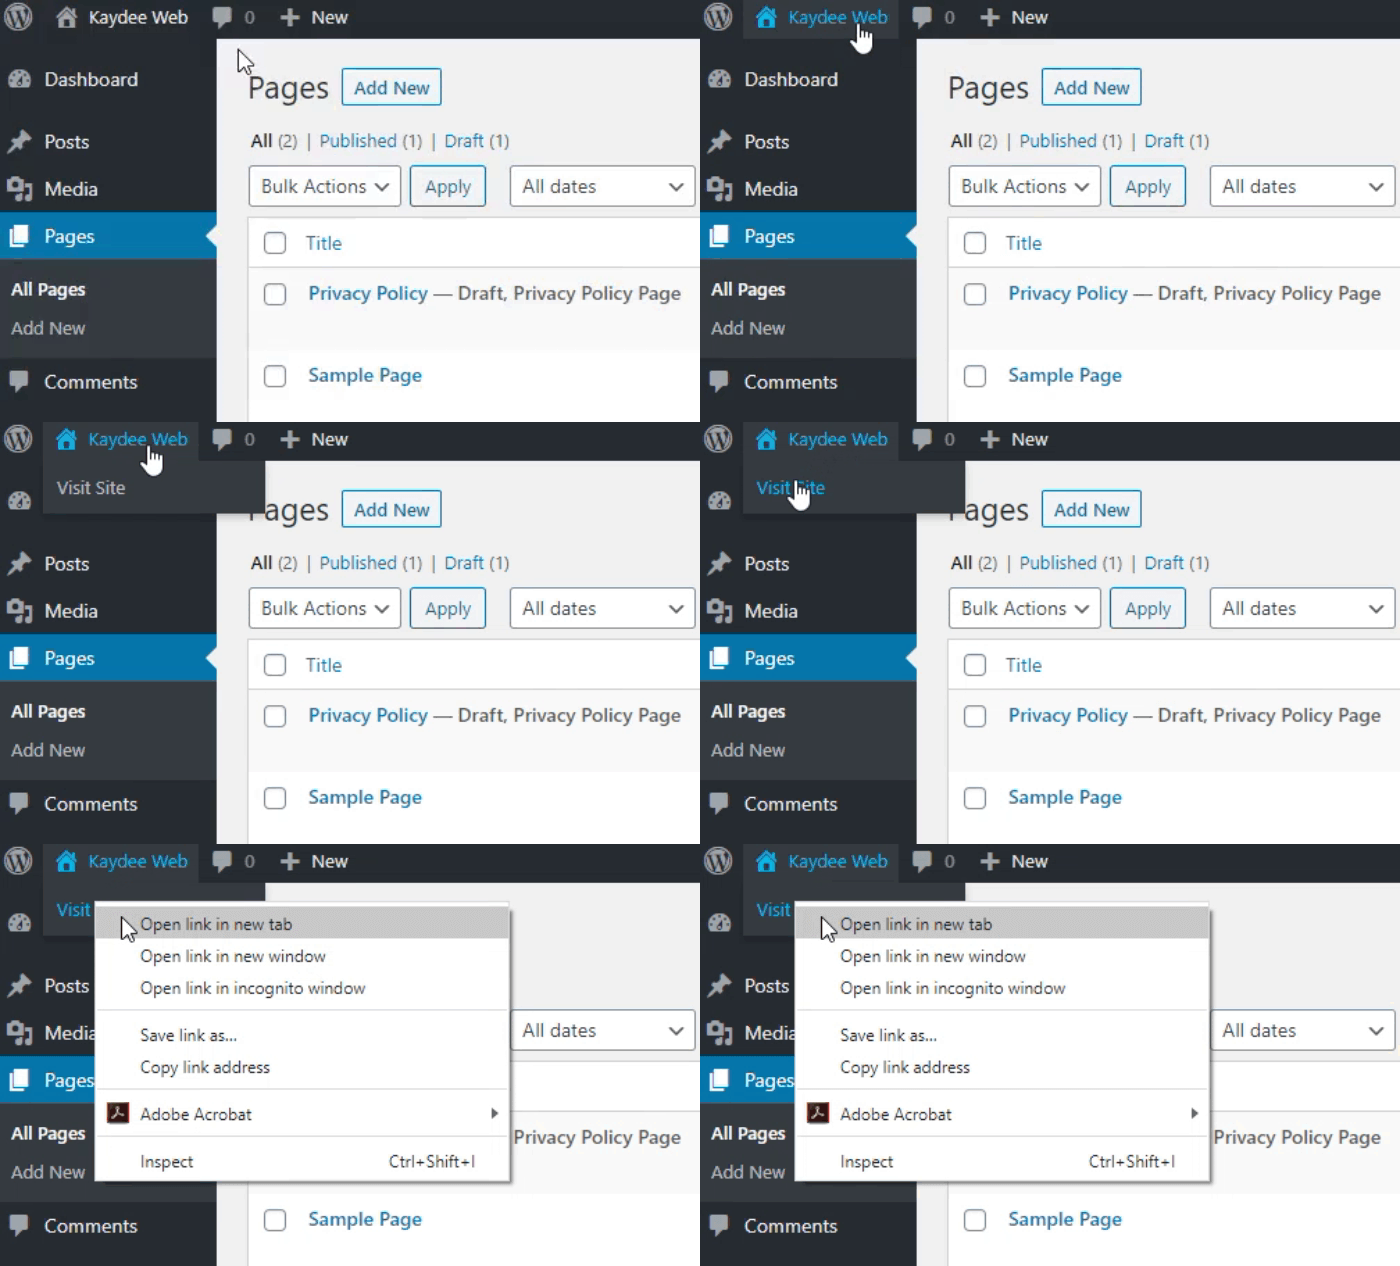
The easiest way to open the front end of your WordPress website in a new tab is;
- In the admin area – hover over the house icon at the top left of the screen.
- From the drop-down menu, RIGHT-CLICK on ‘Visit Site’.
- Click “Open link in new tab”. We have underlined this in red below.
NB. There may be a variation of words depending on the browser you are using.
Two browser tabs are now open, meaning that you can switch between the two.
Continue to edit the WordPress page in one tab, using the admin area.
On the other, you will view the front end of your website to check each change you make.
As you make edits and save them, you can tab over to the site’s front end. Hit the F5 key to refresh the page – this prompts the browser to show the updated version.
Editing Page Content in WordPress
Now you have set up your work area; let’s start in the admin area. Here you will find the WordPress editor.
Click PAGES on the left-hand menu. The pages within your site are listed.
Further options appear when you hover over a page’s name.
EDIT will take you through to the full edit screen.
QUICK EDIT will allow you to change title, slug, date, privacy, parent, order, template and status from this screen.
BIN will send the page to the rubbish bin. The page will no longer be visible on the website.
VIEW will let you see this particular page – the front (or public) end.
To edit a page, click the first option, EDIT. Or click on the page name.
You will arrive at the WordPress ‘page edit’ screen.
Editing Pages in WordPress – a Tutorial
We must first bring your attention to the themes and plugins within WordPress, which sometimes customise the ‘page edit’ screen.
For example, DIVI uses an interface called the DIVI Builder; and there is the Elementor Page Builder.
Which Version Are You Using?
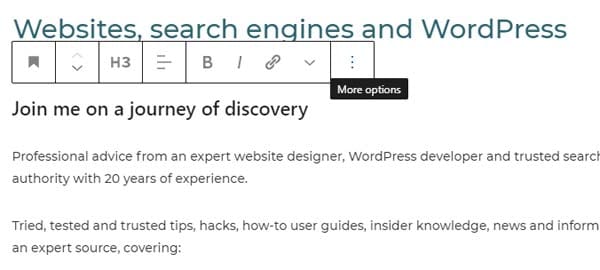
The latest WordPress editor is the Gutenberg Block Editor. If your page looks similar to the image below, you are using blocks – visit our post on the Block Editor.
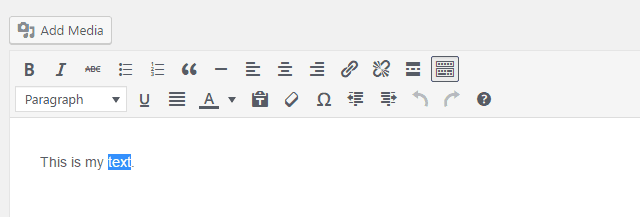
If the WordPress editor looks similar to the image below, you are using the classic WordPress editor.
If you’re not using a custom builder, we can begin.
WordPress Editor Button Icons Explained
In the classic editor, the first button icon is the TOOLBAR TOGGLE icon, once called the ‘kitchen sink’. In the image above, you can see it is activated because it’s inverted.
The toolbar toggle icon looks like this:

This button icon toggles extra formatting options. Keep it activated.
Formatting Text in WordPress
Like most WordPress editors, you can highlight text and format it.
From left to right on the main editing bar are:
B – makes the text bold or strong.
I – put the highlighted text in italics.ABC – this will add a strikethrough to text as if to cross it out. Handy for sold items.

The button icon for an unordered list in web talk is called a bullet list in WordPress. Use this to create lists. For example:
- This is the first point.
- This is the second point of order.
At the end of each line, press return (or enter) to add a new bullet point.
A quick tip: clicking SHIFT-ENTER creates a line break, which is helpful in bullet lists, as you can drop down one line without making a new bullet.
- This is the title of our first point.
We say a little about this underneath by hitting SHIFT-ENTER. - Now we have a second point.
A bit about this.
To discontinue a list, just hit return twice after the last line. Or hit the icon for a second time. WordPress will return to normal paragraphs.
Your website designer, or theme, may have used CSS to style the lists. You’re not always able to change the style within the WordPress edit screen.

This icon is the numbered list, called the ordered list. Use it the same way as the bullet-point list above, except that the list will be numbered.

Blockquotes indent a text line. Again, the theme or the web developers may have styled these, so you may not be able to style them.
Next up is the horizontal line. Use the horizontal line to create breaks in chunks of text. The theme controls the styles. The one above is the default style – a grey line at 1 pixel.
Aligning paragraphs in WordPress

The layout for paragraphs and headings is set in a style sheet, which makes these alignment buttons act a bit erratically.
We tend to let the stylesheet govern our paragraphs, but if we add an image, we align it within the WordPress editor.
Click on a line of text, then click an alignment tool—the alignment applies to a whole paragraph.
Quite often, the following paragraph will align with the one above. Usually, that happens when a line break has been used instead of the ‘paragraph’ tags. There is a simple fix.
- Put the cursor at the end of the first paragraph.
- Now press DELETE (backspace) to pull up the second paragraph.
- Hit ENTER to finish one paragraph and start a new one.
- Two can align separately.
Creating and editing links in WordPress

The link icon – both text and images can link to pages, posts or an external website.
To link text in WordPress, be sure to highlight the text first.
A quick tip: Double click one word to highlight the whole word. Hold shift down and click the second word to highlight that too.
Now click your link icon.
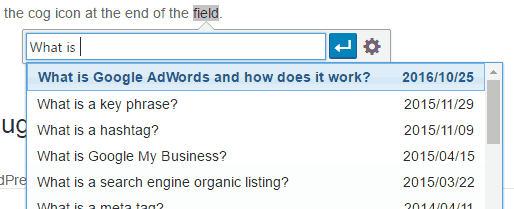
If you are linking to a page/post on your site, start typing the title.
NB: type the TITLE of the page, not the slug.
Once you find the page on the list, hit the blue ‘return’ arrow at the end of the field to apply it.
To customise the link further, click the cog icon at the end of the field, then click Apply.
The cog icon opens a box with LINK OPTIONS; choose the page you want to link.
Not recommended, but links can open a new window (or tab). Just check “Open link in a new tab” within the link options screen. Google penalises links that open in a different window – users must be able to make that decision.
A quick tip: In the latest version of WordPress, you don’t even have to press the link icon when linking text. Copy the link to your clipboard, highlight the text and press control-v to paste the link.
To link an image in WordPress is a similar process.
Select the image, then click the link icon. Follow the steps above.
How to Edit a Link in WordPress
To EDIT links, follow similar steps.
Highlight the text or select the image. Either use the same icon and change the link to the new one. Or click the pencil icon that appears.
How to Remove a Link in WordPress

This icon completely removes the link. Just click anywhere on the text link or select an image, then hit this button.

The read more icon is one we never use. WordPress lets you put text inside a READ MORE tag, hiding it on the page until the user clicks to read more. The text will still be available for search engines to crawl, but Google doesn’t appreciate hidden content.
Paragraphs and Headings in WordPress
Within the toolbar, you will see a drop-down menu.
To format a line, click the text in the line or paragraph, then use the drop-down menu to select a paragraph, heading 1, or heading 2.
The theme sets the style for headings and paragraphs, which keeps the website design consistent.
Use the correct heading tags, and the design will carry through the website.
More Formatting Tools in WordPress

Use this icon to underline text in your WordPress content, making it stand out or make a statement.
Just highlight the text and click the underline icon.

A text alignment tool will create a justified paragraph. Spacing is adjusted between letters and words so that the text is flush with the left and right margins. Also known as fully justified or full justification, and great for text within columns.

As a WordPress web designer, we advise you use this icon with caution. The button changes the text colour. I’ve seen clients create bright, colourful sentences intending to attract attention. It doesn’t look good. Keep text uniform.

Why have the ‘paste as text’ icon in WordPress at all? Text copied from a website or a Word document retains its format. Paste it to a WordPress page, and you paste the formatting. The page ends up looking awful because the code is in unhelpful positions.
So next time you copy and paste, copy, then place your cursor and click the ‘paste as text’ tool to add text with no formatting. Then format it within WordPress.

If you find your text all over the place on a page, it is often formatting. If you know what you’re doing and have a backup, use the ‘clear formatting’ tool to remove all formatting, stripping your text back so you can format it yourself.
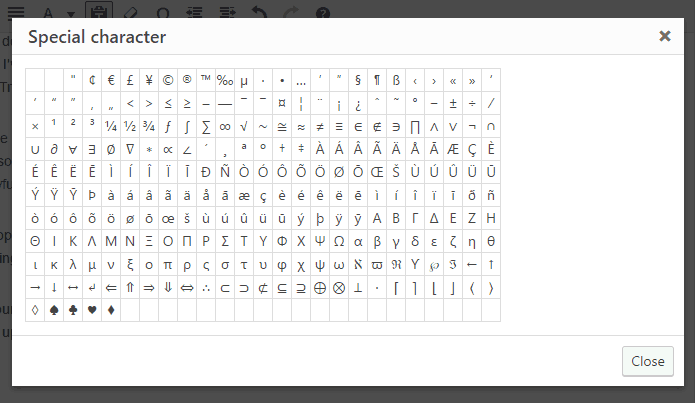
The next icon, the Greek omega, opens the character map below, enabling you to add special characters such as acute, grave, and circumflex accents. Useful if you are creating a multilingual page.

These are the indent icons. Using them, you can increase or decrease the indentation of a paragraph or heading.

And finally, the undo/redo icons. The one on the left is for undoing, and it is really useful. It is darker grey in this image because there is an undo move that we can make. The redo button is disabled – there is nothing that we can ‘redo’ at this time. To redo something, you must undo it first.
Save a WordPress Page
When you make substantial changes to your WordPress page or post, click the UPDATE button to save the page. This updates the public-facing page. Always refresh your page when viewing changes on the front end to check your work.
Auto-saves and Revisions in WordPress
WordPress frequently auto-saves page drafts.
Revisions of your page can be recalled using the revisions link. It’s found within the POST settings. If the post settings are closed, click the cog in the top right to open them. Then hit the Page tab (or Post tab depending on what you are editing) at the top.
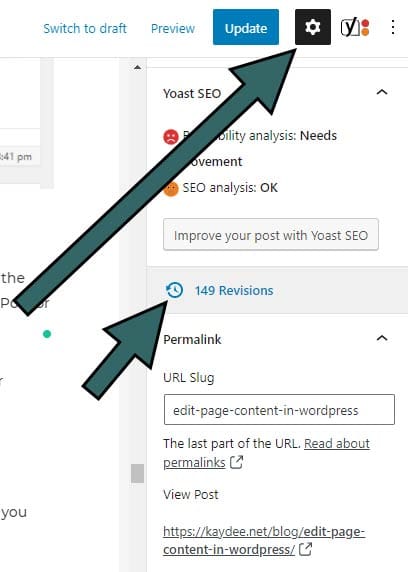
- Click the ‘Revisions’ link to view drafts and revisions that have been stored over the lifetime of the document.
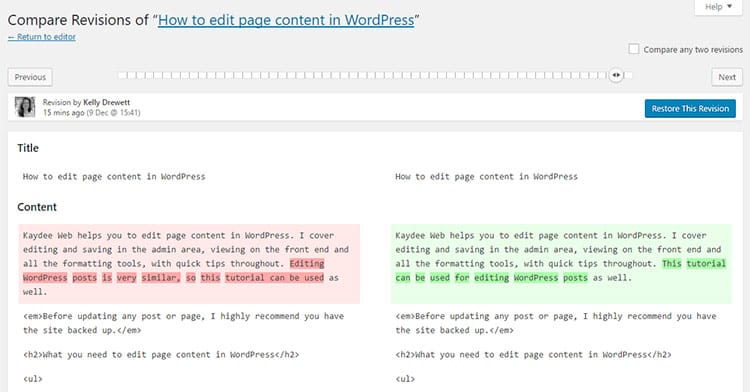
- You will arrive at the ‘Compare Revisions’ screen.
- There is a timeline bar at the top of this screen that represents the page’s life. The further left you move the slider, the older the page revisions are.
- WordPress highlights the changes made by comparing the latest post to a post you choose on the timeline.
- To retrieve the most recent version, move the slider all the way to the right.
Editing permalinks in WordPress
Permalinks – also known as slugs – create the URL of the web page in WordPress. Links to the page can be broken when you edit a permalink, so please edit with caution.
If you plan to change or edit permalinks, we recommend using a redirect plugin like Redirection.
A quick tip: If you’ve changed a permalink without meaning to and can’t remember the original URL, search for the page using Google. Search the company name and the topic. You should see the original URL listed. Change the permalink to the original.
Final Word
WordPress can be frustrating if you do not understand what you are working with. I’m sure these instructions will help you, along with the other WordPress guides and tutorials on the Kaydee Web blog.