
UPDATE November 2016: ThemeFusion has updated Avada to Version 5.0. This update separates the Fusion builder to an individual plugin, instead of being incorporated with the plugin Fusion Core. Fusion Builder has been completely redesigned and is very different from earlier versions.
When you are asked to do upgrade Avada BACKUP your entire site, including the early Fusion Core plugin, and be prepared to spend some time reorganising your pages, as they do not move over seamlessly.
If you have already done the Avada 5.0 upgrade and your pages are broken, get your hands on an earlier release of Avada. Using FTP go to the wp-content/themes folder and backup the new version. Then rename it, and FTP the earlier version. You should get the neater version of your pages back.
This post is for Version 2.0.3 or earlier.
Using the Avada theme
If you have the Avada theme on your WordPress install it is possible to use Fusion Builder to build your posts and pages, which is quite different from a standard page update.
Fusion Builder is a plugin developed by ThemeFusion, the developers of Avada, that enables a responsive layout within the theme.
It can be a little confusing for first-timers.
I’ve written some instructions to help you edit pages or posts, using Fusion Builder within the Avada WordPress theme.
Always back up before making changes
Never update WordPress core, themes or plugins without first doing a full backup of the plugins, themes, uploads and database.
Updates can cause something else to break, and you need to be able to easily revert back or debug. I would recommend doing major updates on a development site so that you can test it first.
Activate Avada’s Fusion Builder
First activate Fusion Builder on the page or post, using the blue-button above the edit content area.
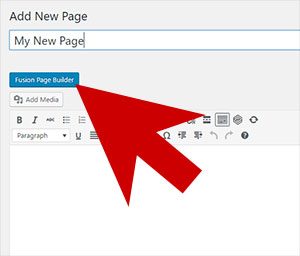
If your web designer has already set the pages up, they may have already clicked the button. It will change the look of your content editor, as below.
Using Avada’s Fusion Builder you can build responsive web pages.
How to edit pages using Fusion Builder
Log-in to your WordPress back end.
Go the pages or post, using the tabs on the left-hand side, and then edit.
The Fusion Builder box should be at the top of your page editing screen. The buttons at the top are labelled ‘Column Options’, ‘Builder Elements’, ‘Custom Templates’ and ‘Pre-Built Templates’.
We are going to ignore Custom Templates and Pre-Build Templates for this post.
Get started
Fusion Builder Column options
Choose a Column Option when you want to split your page into columns. This inserts a column structure to your page, in which you then put Builder Elements. Column sizes and numbers can be changed later.
Once you choose a Column Option, that option appears in the white space below. To build your page think like you were putting a puzzle together.
If you have added a column of 5 x 6ths on the left, the only other option that will fit on the right is 1 x 6th.
You can drag one column from the left of the page to the right of the page.
Click the minus button on any one column option decreases the number of columns that element will take. The plus button is the exact opposite.
Fusion Builder Elements
Builder Elements can be added without first choosing a Column Option. The elements will be inserted on one row that spans across the whole of your page. These can then be dragged inside a column if needed.
There is an array of Builder Element options in Avada. Let’s start with the text. Once you have added your columns, as above, you may like to add a text block to a column.
Just click the Builder Element button, find TEXT and then click and drag it to your column.
Hover over the element, then click the paintbrush icon that appears top right to add or edit text.
All elements can be edited in using the same edit icon.
Change the text, or the medium within the element, then click SAVE, the box will close.
Once that window closes, click the blue UPDATE button to save your changes.
Editing Content Boxes within Avada
Content Boxes are found under Builder Elements. These are useful as they are really flexible.
Within the one element ‘Content Boxes’ there can be several ‘child boxes’, or ‘Items’, which can be added by scrolling to the very bottom of the Content Box screen.
The main Content Box screen changes options for all child boxes unless the ‘child’ has its own style.
Go to the edit screen for your Content Box, using the paintbrush icon.
The options within Content Box, are as follows:
Parent / Child Settings
“Parent Level” settings will control all box styles together. “Child Level” settings will control each box style individually.
Content Box Layout
Select the layout for the content box
Number of Columns
Set the number of columns per row.
Content Alignment
Works with “Classic Icon With Title” and “Classic Icon On Side” layout options.
Title Size
Controls the size of the title. Leave blank for theme option selection. In pixels ex: 18px.
Title Font Color
Controls the colour of the title font. Leave blank for theme option selection. ex: #000
Body Font Color
Controls the colour of the body font. Leave blank for theme option selection. ex: #000
Content Box Background Color
Leave blank for theme option selection.
Icon Background
Choose to show a background behind the icon. Select default for theme option selection.
Icon Background Radius
Choose the border radius of the icon background. Leave blank for theme option selection. In pixels (px), ex: 1px, or “round”.
Icon Color
Leave blank for theme option selection.
Icon Background Color
Leave blank for theme option selection.
Icon Background Inner Border Color
Leave blank for theme option selection.
Icon Background Inner Border Size
Leave blank for theme option selection.
Icon Background Outer Border Color
Leave blank for theme option selection.
Icon Background Outer Border Size
Leave blank for theme option selection.
Icon Size
Controls the size of the icon. Leave blank for theme option selection. In pixels ex: 18px.
Icon Hover Animation Type
Select the animation type for the icon on hover. Select default for theme option selection.
Hover Animation Color
Select an accent colour for the hover animation. Leave blank for theme option selection.
Link Type
Select the type of link that should show in the content box. Select default for theme option selection.
Link Area
Select which area the link will be assigned to. Select default for theme option selection.
Link Target
_self = open in same window
_blank = open in a new window. Select default for theme option selection.
Animation Delay
Controls the delay of animation between each element in a set. In milliseconds, 1000 = 1 second.
Offset of Animation
Choose when the animation should start.
Animation Type
Select the type of animation to use on the shortcode
Direction of Animation
Select the incoming direction for the animation
Speed of Animation
Type in the speed of the animation in seconds (0.1 – 1)
Margin Top
In pixels (px), ex: 1px.
Margin Bottom
In pixels (px), ex: 1px.
CSS Class
Add a class to the wrapping HTML element.
CSS ID
Add an id to the wrapping HTML element.
Editing a Content Box ‘child’
Click the paintbrush icon, to edit the Content Box.
Scroll to the bottom to find ‘Add New Content Box’, or possibly ‘Content Box Item 1+’, if there is already an Item within Content Box.
Edit text, images, add icons and change numerous options on the Content Box ‘child’ here. These settings will overwrite the parent settings.
Now click the blue SAVE button. The edit box will close.
Remember to click the UPDATE button on the right-hand side to save the page.

Hi Kaydee
I have started updating my site and found your page – you are missing an essential bit of information in the sentence below:
“Once you ????? a Column Option that option appears in the white space, below the options. To build your page think like you were putting a puzzle together.”
Hi there Stephen, sorry this post might be a bit out of date, but the word you are looking for is choose;
“Once you choose a Column Option, that option appears in the white space below. To build your page think like you were putting a puzzle together.”
Hey there, if you want subscribers to a newsletter try using Chimpy, which is a WordPress plugin that integrates with MailChimp. MailChimp is great free software for e-newsletters. Hope that helps!